I’m not really sure what the technical term is for a piece of built-in furniture that also doubles as a stair guard rail, but we’ve decided to call it a stair cabinet!
Anyhow, the stair cabinet is another one of our chezerbey small-space, double-duty solutions. Now that we’ve blown out most of the interior walls we have less wall space for storage, so it’s great to be able to gain some of that back. The design has evolved over the last several months and in the end we arrived at a semi-custom/semi-IKEA solution. (The great thing about SketchUp is that you can try a number of different ideas in a very short amount of time.) The four white cabinets are IKEA Akurum wall cabinets (probably with the high gloss Abstrakt doors). I really wanted open shelving above for books and some type of catch-all for keys/mail/phones on top. This is the custom part. Once we figured out the general form and design, we started wrestling with what material we would use. The shelving was too deep for solid wood 1x boards but we weren’t sure we wanted to go the veneered Europly route ($$).

And then Kyle said, “I have a genius idea”.
Design iteration #2 – we go ahead and use 1×12 boards (fir, of course) so they’re intentionally shallower than the base cabinets below. Add a counter surface to the top of the cabinets and you have a display and shelving area that can also be used as a buffet for parties or Thanksgiving. The back of the cabinet (which we’re thinking would be painted or covered with p-lam) would keep dishes and serving forks from accidentally getting knocked down and into the stairwell below. (No cranberry relish-splattered white walls to ruin the day!) This rendering still shows some type of catch-all object on top but we’re thinking it could be incorporated as part of the open shelving as well. The ends of the white cabinets would also be faced with a blank door face so you don’t see the boring melamine finish. This design also seems less oppressive than the first one. It’s friendlier. And isn’t that a quality we all look for in a stair cabinet?

So I picked up the cabinet boxes a few weeks ago and we got to work building the basic frame. After assembling the boxes, Kyle installed plywood to the backs for extra rigidity. Notice the jorts? Oh yeah!

The cabinet boxes were fastened to each other and then to a plinth made of 2×4’s. Another layer of plywood was added to the back (to keep everything from racking and to provide a substrate for the sheetrock) and then we added a couple of metal framing anchors (between the plinth and floor) for good measure.

Since the drywall on the backside would be butted up against the fir wrap, we needed to get it built and in place. Much to Kyle’s happiness, this meant a new tool – a biscuit joiner. We didn’t want any visible fasteners, so we biscuited the top and side panels to each other and into the plywood substrate.

Such fun! Good thing too, we only have 7 other custom cabinet pieces to build.

FSC biscuits! Yum!

After the boards were in place, Kyle installed a coat of Benite, a penetrating wood conditioner. We’ve applied one coat of Satinthane, a polyurethane finish, and will apply one more after the drywallers are done.

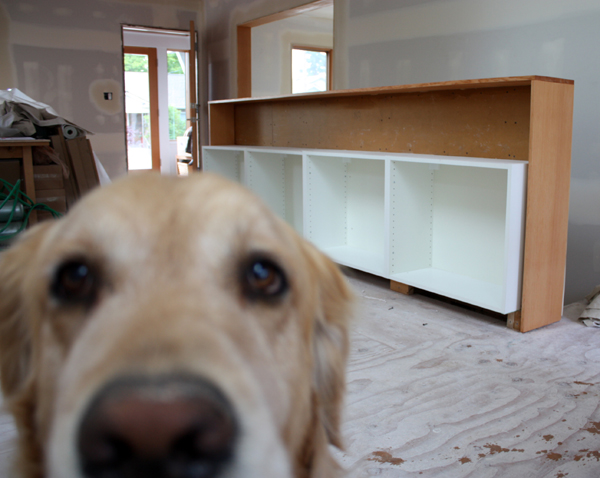
This is what it looks like now. The fir wrap is actually really sturdy so we don’t necessarily need any intermediate supports.

I took these pictures right when I got home from work. Bailey had not been fed yet.

We’re thinking p-lam for the back face of the open shelving, for a little color(!). The counter material is TBD, we can’t justify using a spendy kitchen counter material, since this surface won’t get that much abuse and we can easily use a towel or trivet if it’s used for hot food. The dimensions work well for some type of shelving material but I really don’t want to do melamine. Fortunately, we have some time to think about it.

We chose to do the back side in drywall, so it would really read as a built-in part of the house. (The fir is proud of the drywall by about 1/4″. There’s tape on the edges right now to keep mud from getting on the wood.) The stair handrail will go on the opposite wall, so this could become some type of display wall in the future. It’s something to think about at least. (We also have an awesome idea for stair lighting…but we need to do some more investigation and designing first.)

This end is open because it’s where the loft ladder will go. The loft ladder still needs to be designed. I’ve been looking around for an inexpensive, industrial type ladder that could be used as a temporary fix…but no such luck. Any suggestions? It needs to be a true ladder that can be installed at an angle and at least 9′ tall.

Bailey, don’t do it. You remember what happened last time.

So what do you think? I was hesitant of the 1×12’s at first but the added versatility of food display eventually won me over. (Hmm…and maybe one of the cabinets could be used as a mini-bar.) Party at our house!
Oh man, you guys, it looks so great! You must be really proud of yourselves. Awesome design, great finishes. BTW, the drywall/mudding looks awesome too. Fun post! (Sorry for the boring adjectives tonight, I’m tired and it’s not even 8:00.) I know you’re putting a ladder on the side opposite the stairs, but will it be a drop-down/folding one? That’s what I seem to imagine, but then you’d have to put up some sort of railing (to keep Bailey from doing what he looks like he really wants to do!)? Just let us know when the party is, we’ll be there! 😉
Love the Joseppi’s cup! All those cups from the Joe’s establishments really come in handy over the years, don’t they? Most recently they were bath toys for visiting nephews at our house!
once again, I’m in awe of your work – you guys are awesome! I really like the plywood counter you did in the bathroom, and think that would look great on the stair cabinet counter. 🙂
ps. we bought the paintshaver pro the other week, and once we figured out how to use it (we were going in the wrong direction with the blade at first) we love it!
This is brilliant. I’ve been tossing about a similar idea to replace a god awful wrought iron thing in my entryway. If only we had an Ikea out here… Great design work, love watching the progress.
Looking great! Your place is really coming together. The last post was amazing. Looks so different with drywall. I am envious of this storage unit. I think I like the first one better, but totally understand going the cheaper route. I might have to find an excuse to get a biscuit joiner myself =)
Nicole,
Are you from OK or spent some time in Stillwater then? I think that was actually our last Joe’s cup, when we moved here 7 years ago we must have had a couple dozen.
I love the design you went with much more than the original. That’s such a neat idea for a storage center/buffet for par-tays! Also, please tell me that Bails never tried to jump off the ledge…. you should put a balloon or a giant turtle there so he won’t go near it. : ) P.S. I love the Joes cup. I have one remaining one here and it glows in the dark…
Robyn,
Bailey did fall down the stairs once, we had a clear plastic sheet covering the hold so dust wouldn’t go down and he didn’t of course realize that it was not a structural walking surface, he bounced right up and I think thought it was fun for some reason. I still felt bad, he’s so funny
Once again you’ve got me thinking….this is beautiful! We have a similar stairwell where we currently plan to use steel railing with translucent paneling. But I love the idea of incorporating more storage! Does your downstairs lead to living space? Bedrooms? How do you plan to light the stairwell or otherwise bring more light downstairs?
Have you chosen barn door hardware yet? Do you have a source? I’m scoping out alternatives, and boy, it can be a budjet buster(we’re planning for 3 sets). Even the galvanzed hardware is significantly more expensive than I remember.
And that fir wrap? Waaaay tasty!
Hey Yolanda,
The stair leads down to an unfinished basement (and it’s where we’re currently “living” since our current project started in April). We have plans to finish it out with some more “double duty” spaces, but that won’t be for a little while (Check out the “design” page for a floor plan of what we’re thinking.)
For lighting, we will have a recessed can light at the top and bottom of the stairs with a 3-way switch connecting the two. We’ve also got some ideas about step lighting, but don’t have the details quite worked out yet.
We haven’t chosen the barndoor hardware yet. You’re right, it is expensive, even the industrial stuff! We’ve got some more research to do and will probably dive back into that in the next couple of months. We’ve gotten pretty used to living without doors so it’s not a super high priority and we want to see how the rest of the space turns out before we pick door and hardware finishes. =)
Thanks Kate, plywood is definitely an option. We have a few other areas where we’re not 100% sure which material we want to use so I think we’re going to see how the space comes together and then narrow down the options. The tricky thing for us with our small space/great room concept is that we want things to go together but not be too matchy-matchy.
Glad to hear you like the paintshaver!
Hey Laura, we thought about a fold down ladder, but you’re right, we need a guardrail there and don’t have enough space for both. Right now we’re thinking about a ship ladder or “alternating tread device”. It’s like a ladder but the treads are offset from each other (and usually deeper) so it feels more like a steep stair. Of course, we’ll have to build it ourselves and since it will be right in the middle of the house we want it to be awesome. =) So…it may take a while.
Kyle, my man grew up in Stillwater so I spent a summer living with him there while I was in college and three years living in Oklahoma City after I graduated. I don’t know what happened to all of ours, either–did I throw them away?! If so, I regret it now. They’re so handy!
hey guys,
I originally got on here to comment about the Joe’s cup. clearly, others beat me to this one. so on to other things. I tried to pull this idea off in one of our house projects recently, but it was nixed by Amy, so I’ll pass it on: the counter surface… what about making a butcher block out of old 2x material pulled out of the original framing? we threw a ton of that stuff in the dumpster during demo, I guess, but surely there is more laying around? I love when objects like that, not only are recycled material, but also have a story behind them. on our new barn doors, I used some t&g cedar I salvaged from someone’s bedroom walls, here on the island, and I used the smooth face with v grooves exposed. they were mounted rough side out in the bedroom, so the smooth side of the boards had contractor numbers and scribbles on them. it adds alot at a detail level, sort of like your “carkeek.”
just a thought… oh– and its a LOT cheaper than quartz!
Hey Jason,
Unfortunately, all of our old framing is long gone. The people who make butcher block for Ecohaus (I think they’re out of Tumwater), do have a product where they take all their scrap, glue it up and then make 3/4″ thick slabs out of all reclaimed fir. It’s pretty cheap ($20/SF I think), so we’ve considered using that somewhere. Meyer Wells also makes butcherblock out of reclaimed glulams but it’s pretty spendy. BTW…I want to see some pictures of those barn doors!
[…] design – part two December 19, 2010 by chezerbey Forever ago (August), we posted part one of the stair cabinet design. A second cousin to the fauxdenza, our stair cabinet is a series of […]
I love that it is closed storage! About 2 years ago we took our our weird, ugly banister and put in some open bookshelves made of pine, painted white. Really unprofessionally done (by me)…but now I want to close up the whole thing with doors and get rid of the pine bookcase because it’s just so unfinished and mehrnnn.
I am copycatting this in our 2 floor condo. Having trouble figuring out size. We’re doing ours in 12 7/8” depth because 15 would make the area feel too crowded, but height-wise, I can’t decide between 30 and 39 in. We too are using 2x4s to make the base.
30 is too low without a display and top part (as you did), but 39 feels weirdly tall for a banister.
Yep and keep in mind that 30″ it (by code) too short for a guardrail. (Which is one of the reasons why we added to the top of ours.) Good luck!