I’m just going to say it – June in Seattle is depressing. While the rest of the country is swimming, sunning and generally embracing summer, we’re still wearing sweaters and crossing our fingers that our tomato plants don’t keel over due to lack of sun. (The joke is that summer in Seattle doesn’t start until after the 4th of July and that’s usually about right.) But, if there’s a silver lining to the gray permacloud at least it makes it easier to work in the basement.
So with the crappy weather on our side, last weekend was a productive one and Kyle was able to finish the framing and electrical and get started on the subfloor.

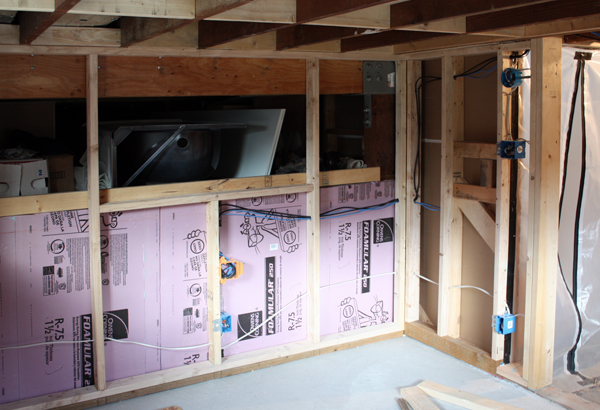
For a small project like this, we just talked through where we would want outlets, switches and fixtures instead of producing an electrical plan. Our main goal was to come up with a layout that would provide the most flexibility whether the space is being used as a TV room or bedroom. Because of our short ceiling height, the biggest challenge to figure out was lighting. Obviously, you don’t want anything hanging down and recessed cans wouldn’t work with our exposed joists. So the plan is to install a couple of wall sconces (you can see the round electrical box for one in the photo above) that flank what will eventually be a built-in media/storage unit.

Kyle also framed out the little closet that contains the sewage ejector pump and access to our under-the-mudroom storage.

To make the space feel taller we’re leaving the joists exposed but the actual detail is a bit trickier. Unlike our living room ceiling, in the basement we have to contend with all the exposed nails coming through the subfloor from the old oak floors above (that are now covered with plywood and cork). Our solution was to furr down with 2×4’s and then attach sheetrock to that. Finally, we’ll sand up the joists a bit and then paint everything super white.

Here’s a shot looking back the other direction. Above the window, we’ll have a soffit with three recessed cans. There is likely to be a couch or bed against this wall so a little direct lighting made sense. The round electrical box in the foreground is for a smoke detector (required in every bedroom!) and the rectangular duct goes to the nursery above. When we had our new furnace and ductwork installed nearly 4 years ago, we had a feeling this space would eventually get finished out and made sure that any ductwork was as minimal as possible (same goes for the electrical, which is run only along the perimeter where it will be covered).

On the opposite wall Kyle roughed in power, data and cable. The TV/DVD/Xbox are in the living room for now, but the plan is to eventually move everything downstairs. I’m hesitant to use the words “media room” or “man cave” but we do see this room as a cozy space to watch movies.

Poor Bails, spending his weekend watching Kyle work. He might be the only dog that willingly will nap next to an air compressor.

Before the weekend was over, Kyle also got started on the Dri-Core subfloor (he’s actually installing the last pieces as I type). The 2’x2′ panels are comprised of a layer of OSB over a black dimpled plastic. Even though we installed a moisture barrier under the new topping slab, the plastic backing provides an airspace and keeps any water that might find its way in from coming up through the floor.

The panels have a tongue and groove slot on all four sides so they click together and form a floating floor system. They can be easily cut on a table saw and the whole process took a couple of hours max. At the edges, Kyle used wood shims to hold the panels away from the wall (to compensate for any future expansion and contraction).

For a snug fit, he whacked each panel in place using a few 2x’s and a mallet. (It’s hard to tell in the photos, but the seams are staggered for a more uniform installation.)

At the edges, he used a pry bar pushed against the sill plate to ensure a tight fit.


Naturally, Bailey was on hand to supervise. (I know, he is SUPER shaggy right now and is going to the groomer on Saturday!)


“A little to the left dad…hey, watch my paws!”
Kyle finished the subfloor tonight so the next step will be to frame the rest of the small hallway at the bottom of the stairs and pour a leveling slab. This weekend he’ll insulate and install the interior doors and then we’ll be ready for inspections and sheetrock. My mom has a feeling that zerbebe will come a week early and she tends to be right about these things so no dilly-dallying for us.
[Random side note – we were in the basement tonight hashing out a few details when Kyle nonchalantly tossed a pry bar on the floor. The sound made zerbebe jump, which is the first time that’s happened. Better get used to that kiddo. =) ]

Lauren Zerbey is a Seattle-based architect and principal at Studio Zerbey, specializing in custom homes and residential remodels. With over 20 years of experience in the Pacific Northwest, she writes about the relationship between thoughtful design, creative problem solving, and the livability of the homes we love.
Brilliant work as usual. You make DIY humbling. Love how your finishing the basement. We’re making plans for ours as well and had considered DriCore but are settling on a .5″ XPS base (for insulation) with a 5/8th plywood top anchored to the slab via Tapcon screws The pricing seemed a bit better, still DIY and provided the insulation needed for Chicago winters. Did you ever consider a similar set-up?
We still haven’t confirmed what the top surface will be; e.g., carpet, FLOR, tile, floating cork, etc.
p.s. Good luck with the Babe. It’s a fantastic gift but boy does it change your schedule! Even more so with the second…
Your basement progress is really impressive, especially since you actually have jobs as well.
One small issue that keeps coming up on – my computer at least. The wordpress:Customized Vigilance outline keeps popping up and staying at the bottom of the page. Any way of getting rid of it for good?
I think you should be required to but a bump pic in at least every other post. Basement looks great… can’t wait to see the finished product! But mostly can’t wait to see zerbebe.
I’m so jealous! It was 106 in TX yesterday! Great work, inspiring! 🙂
that sounds like a great solution, we did toss around the idea of buying a roll of drainage mat and then just putting plywood over that but in the end with our time crunch the dri-core cost a bit more but was easy to install. we love the FLOR tile and will probably do that again. carpet makes sense with a potentially cold floor, cork could work too.
me too, I think it might be time to switch, lots of issues with wordpress lately
Haha, ok…next time. =)
Thanks Barb, I did look into this when someone mentioned it a few weeks ago and it’s a new WP feature called “infinite scroll” which basically allows you to read every post in succession without having to click on “older posts” or something similar. A WP support person gave me instructions on how to disable it but it didn’t work…I’ll keep trying! (I agree that it’s kinda annoying.)
Is there anyone else trying to think of a clever name for your new space? Once finished, I imagine ZerBasement just isn’t going to cut it.
Ahh! Ok…I think I fixed it. Let me know if you’re still seeing the pop-up.
actually, I have a folder full of drawings for our basement called zer-basement, I kind of like that;) zer-bonus room or zer-rumpus room could also work.
Great work! Loving the evolution of the space. What will the finished basement ceiling height be? I imagine it will just be useful space to you, and not square footage per King County?
Side note : I sent an email to your info@chezerby and it got kicked back to me. My husband and I are preparing to renovate the basement of a 1928 house (looks a lot like yours) in Cap Hill and were wondering if you have any reccomendations for an architectural designer (yourselves? someone else?) We really appreciate your point of view and asthetics.
Here’s to the end of June!
I continue to be amazed by your progress in such a short time, magicians you are! My guess is today nothing is happening since the sun is out at long last..
Thanks for the e-mail with recommendations, we should be good to go on our project!
How about naming the space Down-Unzer 🙂
nice one
Oh the cuddly Bailey!! I would love to have such a cute “supervisor” next to me when renovating <3
Love your dog!
Love the work! Did you do anything particular to sound proof the basement?
Hi Joe, we installed some batt insulation where there’s drywall on the ceiling but that’s about it. The reality is that there’s only so much we can do in a small and open house for sound privacy.
Thanks. Coming to the same conclusion with my basement project. Can’t tell you how much this site has been a help in my home renovation.