There is nothing quite like the construction phase of a project. Spaces are either created or revitalized and it changes how you go about your daily life. [We still get excited pulling into the driveway and seeing the revamped exterior.] However, after a long stretch of construction work, there is nothing quite like going back to the drawing board. Literally.
Design is fun, especially when you are both architects and it’s your own home. And designing one’s kitchen is perhaps one of the most complex and interesting challenges of a remodel. During our initial design phase, we allocated about a 10′ x 11′ space for the kitchen. To maximize efficiency and connection to a larger great room, we chose an L-shaped layout with a center island. It was also important to maintain a visual connection to the backyard. Because of budget constraints, we are considering using IKEA for most of the cabinets. Right now, we’re looking at the ABSTRAKT line which comes in a few high gloss finishes [modern aesthetic and easy to clean!]. After deciding on the basic configurations, we went to work determining where everything would go and that things we used on a daily basis would be within easy reach. [click on images to enlarge]

Here’s a reminder of what the plan view will look like. Because it will be open to the rest of the house, it is important to make sure that everything has its own spot and therefore reduce the amount of countertop clutter. We also want the space to be very functional and durable. The jury is still out on the cork flooring but we certainly love the feeling underfoot as well as the color.

The south wall will be the main storage area. We won’t have the luxury of a walk-in pantry, so we’ll use a pull-out tall cabinet in addition to the storage space in the island for all of our food items. The pantry cabinet and all the lowers will probably be a high gloss gray-blue finish. The uppers will be a combination of horizontal cabinets with high gloss white doors and open wood shelving for dishes, wine bottles and cookbooks. We’ve been thinking about a steel ledge mounted to the back splash for spices. We’re still undecided on what the back splash should be but are leaning towards some type of solid surface (rather than tile). The dropped beam at the ceiling is needed because this is where the wall between the back porch and current kitchen is. Even though it sacrifices some storage space, we like the idea of not extending the upper cabinets to the ceiling. We feel that this allows the components to read as a cohesive assembly rather than boxes stuck to the wall.

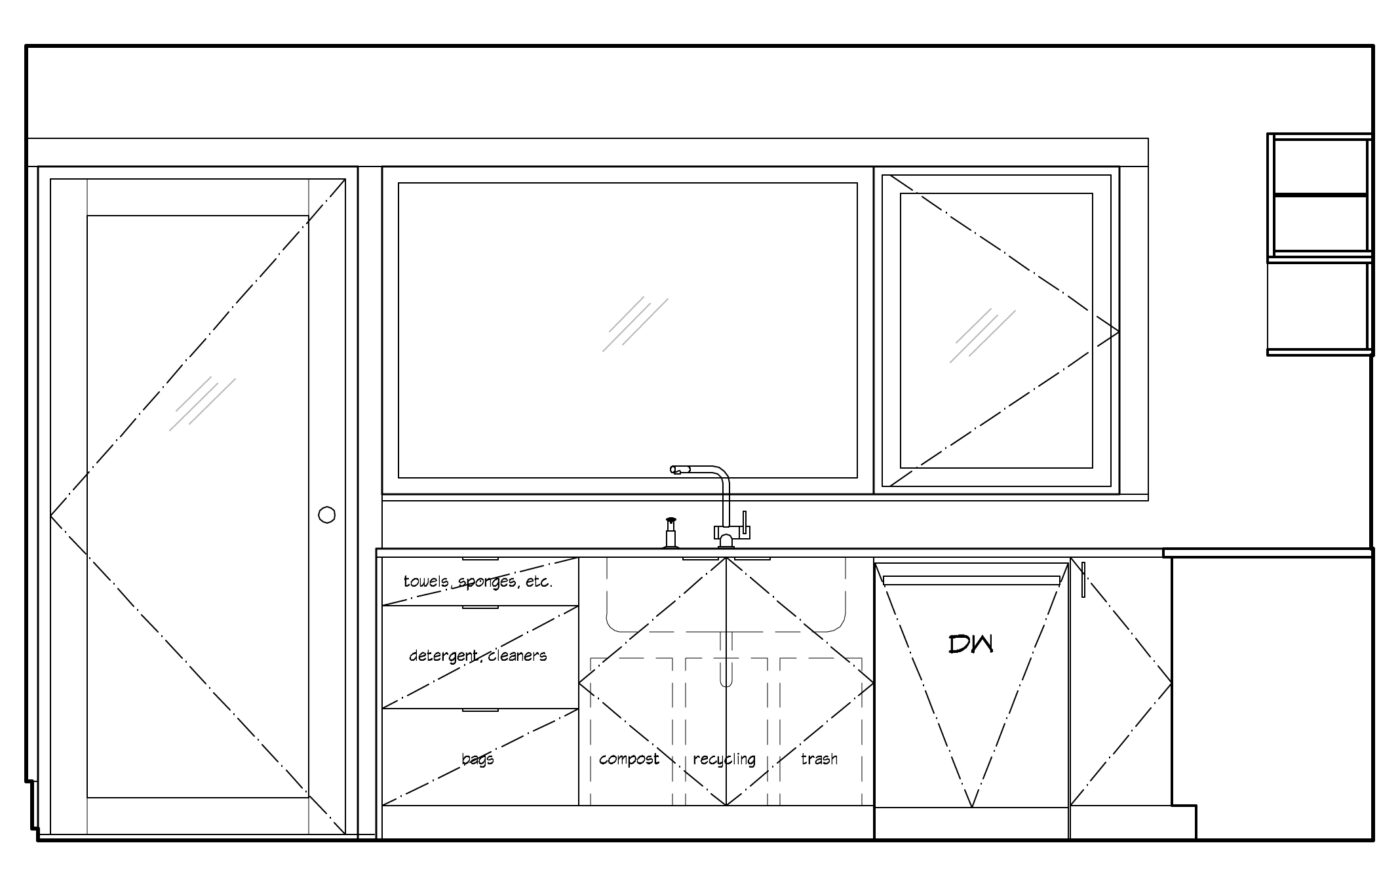
The sink will go in front of the large picture window [installed this summer] and the space below will hold containers for compost, recycling and trash. A lazy susan in the corner will become storage for pots, pans and bowls.

The island will serve as a secondary pantry of sorts. One sidewall will have open shelving to hide a microwave and Bailey’s food and water bowls. The bottom left drawer will hold dog food to make feeding time a bit easier and avoid the big plastic container that we currently have. The countertop will be some type of heavy-duty butcher block and will serve as the main work surface. This is something that we definitely do NOT have in our current space.
This project won’t actually happen until next spring, but as we’ve learned, you can never be too prepared. Besides, it gives us something to look forward to as we prepare meals on our 24″x18″ of functional counter space.
We’ll still be working with limited space and a limited budget, but we think the layout will fulfill our main goals and create a functional and playful cooking space. As things progress, we’ll do more posts on specific materials and color palettes.
I love how you laid everything out. And the dog bowls in a shelf is genius! You can customize if for your dog’s height. I would steal that idea but I think our dog would ruin the wood by spilling water when she drinks. I’ve started a layout for our kitchen but it’s a combination of CAD drawings with Excel files determining where everything would go. We have a big kitchen but finding a place to store things where it will be convenient for us to use them is the issue (two sides of the island are main walkways).
I can’t wait to see how your kitchen turns out!
You’ve thought of ALMOST everything! When I remodel my kitchen, I will be adding a Mixer Lift .
Hey Jessi,
I would love to have a mixer lift, but sadly I don’t think we can sacrifice any of the cabinet space. However, I think I’ve found a spot for everything but the coffee/espresso maker and the mixer so hopefully they’ll look ok on the counter.
Great design, open shelving in a small kitchen is a must. The husband and I agreed on that from the start when we drew up the kitchen plans 4 years ago. Small kitchens are a challenge, ours is 10’2″ x 8′ but we feel in a way that it keeps the purchases of clutter way down. No space means no buy.
Hey Michele, I totally agree with you that a small space keeps clutter at bay. I think the same is true for food if you have a smaller fridge and pantry space you’re less likely to buy on impulse or just because something is on sale. We definitely like the idea of open shelves, though we’re still a little hesitant as our dog’s hair tends to find its way everywhere. Hopefully these will be high enough…we’ve certainly learned that low open shelves are a bad idea (if you have a furry dog)!
You have some excellent ideas for kitchens. That has been one of the recurring themes in my own life–looking for a way to make our bathrooms and our kitchen look really glorious, even though those rooms are much too small. One of the glories of the Internet, though, is that there is absolutely no dearth of ideas. Right now I have no idea of what I will ultimately do, but I keep hoping I will come up with something really slick.
[…] but also all of the design and planning that has to happen first. We’ve given sneak peaks here and there, but there is much more in the […]