Despite our secret hopes, the basement fairy did not wave her magic wand while we were basking in the glow of our new front yard.
Blah.
I know it will be great to have it done (or at least partially done), but there is not a lot of motivation for this project right now (besides zerbebe’s impending birth). So before we dive into a rather lackluster progress report, here’s an updated floor plan that shows the new and improved design [click to enlarge]:

Our main goal for the half basement (which is only about 385 SF) was to have a space that could serve as a guest/tv room and maybe a future kid’s bedroom. This room will be directly under the nursery and about the same size. We debated whether or not the space should be open to the adjacent stair area (and thus feel more connected to the rest of the house), but decided that we needed more flexibility since the room would serve multiple purposes. Our compromise is to install a 36″ sliding pocket door so that it could be open for casual use but easily closed off.
The rest of the space will be divided between a second bathroom, laundry room and a small unfinished space that will provide some storage and access to our crawl space. While the second bathroom is not a current necessity, we decided that as our family grows it will be nice to have and add considerable value to our home (most homes in our neighborhood seem to be 2 br/1bath). As Bailey gets older (something I don’t even want to think about!) it will also be nice to have a tub that he (and small kiddos) can more easily get in and out of.
The laundry room is fairly straight-forward and as we showed you in this post, the new appliances, cabinet, sink and countertop are already in place. On the opposite wall, we saved space for a small chest freezer. We have a rather compact 24″ fridge/freezer combo in our kitchen and while it works for us now, we know we might outgrow it in the future. Since we don’t use the freezer portion on a regular basis (it’s mostly nuts, ice cream and frozen waffles), the thought is to keep a chest freezer in the basement and buy a full-height fridge for the kitchen. While we don’t have any plans to buy a new fridge right away, we did go ahead and buy the freezer. Out of necessity you see…

Kyle just got back from a long weekend of deep-sea fishing off the coast of British Columbia (courtesy of a generous client) and this was his bounty:

King salmon, halibut and some lingcod. (They had it cleaned, filleted, packaged and flash frozen before the long drive back.) Even though we’ve been in Seattle for eight years now, we still haven’t gotten used to the luxury that is fresh fish so a sight like this has us a little giddy. The animals are equally excited and after a dinner of broiled salmon tonight, Bailey showed his gratitude by pre-rinsing plates as I loaded them into the dishwasher. [Psst…we’re always experimenting with different ways to prepare fish, so if you have any favorite recipes I’m all ears.] In addition to fish storage, the new freezer should also come in handy for all those nesting-induced meals I plan to make next month. Yup.
Oh right, the basement. You again.

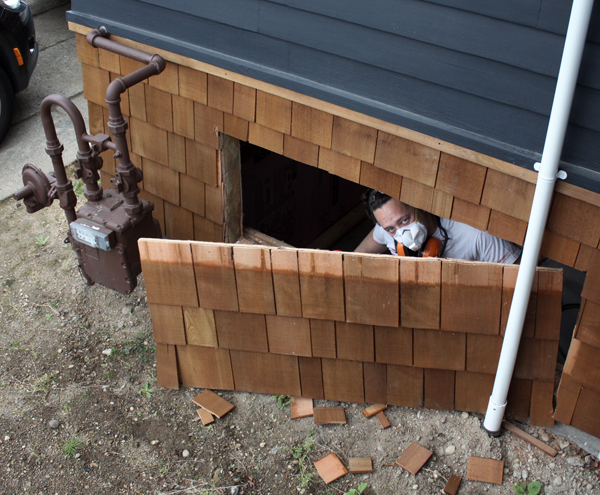
A few years ago Kyle and I got a great deal on some windows that were leftover from a local school project. Most of them were long and skinny, but we made them work in our mudroom and in the “slot” window in the dining area. Since then, we’ve had one remaining window hanging out in the basement with no home. Until now.

At first I was hesitant about adding a window to the front of the house, but after realizing that our new plants would soon screen it from the street, I was on board.

Kyle’s like a window-installing wizard now. The whole operation took a couple hours max and I didn’t even have to lift a finger.
Even though the walls and ceiling are still dark, the extra window does wonders for the space and makes it feel much less basement-y. I can’t wait to see what a good dousing of white paint will do.

The downspout had to be relocated, but no big deal. (It used to come straight down from the porch eave above, but now jogs in and down before reconnecting to the existing inlet).

Like this:

In addition to the window install (which you’ll notice was done before the landscaping crew arrived), framing is underway in the bedroom. Kyle’s been gone the last two weekends so the space hasn’t seen a lot of love (hence this less than epic progress update), but I did manage to snap a few photos the other day:

Our concrete foundation wall (which extends up to the underside of the window in the photo above) needed to be furred out so we could insulate and have a space to run electrical. Although we could have extended this framing all the way to the ceiling, we decided to stop it at the top of the foundation wall (where it switches to original framed wall). This will make the space feel just a smidge bigger and provides a storage or display ledge around the two outside walls. The ledge is primed MDF that we’ll caulk and paint white.

Garden view!

Here’s a shot looking back towards the crawl. We decided it would be weird to have crawl space access from this room so the plan is to frame it in and close it off (after we get the new bathtub out of course).

Because our house is 102 years-old and not perfect, Kyle had to do some shimming in order for the future drywall to be straight and plumb. Sometimes I am in awe of the patience he has to work through things like this.
So that’s where we’re at. We’re keeping the next two weekends open to work on the house and hopefully make lots of progress before our schedules get too crazy. But it’s cool – I’ve already talked to zerbebe and asked her not to come till we’re done. I didn’t get a clear response but I think I felt a nod. Or maybe it was a butt. At any rate, at least it’s the solstice and we’re working with maximum daylight on our side. In fact, Kyle’s outside cutting lumber right now and I bet he has no idea it’s 9:30.
So exciting!
i found your blog through manhattan nest and i have to say: you guys are my heros. i wish you were my neighbors so my husband and i could simply watch and learn.
I love the view of the garden out the window! I can’t wait till the guest room is ready for me to visit. : ) But, you know I will visit even if it’s not.
Fish – cut up into one inch chunks, put in pan along with a good amount of sauce (to cover). Heat until bubbling and leave on the heat for another 5-10 min. I do this with salmon all the time, soooooo fast and easy, great to feed to babies.
We use spaghetti sauce, or some kind of Indian sauce from a jar (you can also make your own but the jar is great when you have exactly 5 min to make dinner)
Totally! I would really love to see you guys in action while I am sipping a cocktail on a very comfy chair! You two really amaze me with the level of detail you put in your work, bravo!
I love this slow-roasted salmon recipe: http://www.seriouseats.com/recipes/2010/06/slow-cooked-salmon-with-ginger-garlic-recipe.html
It’s easy–no flipping, minimal prep, and you can add a salad and some couscous and call it a day. The new window looks awesome. 🙂
Fish in parchment baked in the oven is also a good way to go…it’s really easy! Here’s my recipe: http://www.recipezazz.com/recipe/salmon-parchment-leeks-and-carrots
Can be adapted with different fish, veggies, seasonings etc.
Haha, you better! =) Maybe we’ll even have a real bed down there!
Oh wow, thanks Bliss! Of course, if you were our neighbors you’d have to put up with power tools at all hours of the day. =)
I love to cook salmon on the BBQ during the summer. I slice it into “portions” so each person can decide on their level of cooked/rawness. Corse salt, ground pepper. I cook in “on the skin”.. That way you have crispy chip skin, cooked salmon and sashimi on top if the fish is fresh enough and to your liking! (not until Zerbébé is out though!)
I love to have this with sriracha over a salad or grilled greens/bok choy.
Instead of commercial tartar sauce, make this Mustard Dill Sauce (1 cup sour cream, 1/3 cup fresh chopped dill, 3 tablespoons chopped white onion, 2 tablespoons dijon mustard, 1 tablespoon chopped capers).
If using on salmon, spread 1/3 cup of the sauce on one pound filet prior to baking. Bake at 400 degrees on oiled baking sheet. Or wrapped in parchment paper at 475 degrees until interior temp is 130. Serve the fish with the remainder of the sauce.
I especially like this sauce when there’s that last package of frozen fish…and you’re a bit tired of all the other (healthier) recipes.
The basement is looking amazing! The big windows really help make it feel like it’s above ground. I was wondering what you were going to do with that hole in the side of your house from pouring concrete. It looks like you’re putting every inch of that basement to good use. Oh and we love our small chest freezer. It’s inexpensive, energy efficient, and super handy to have. I’m trying to figure out how to work it into our basement space when we remodel it because we don’t have a convenient utility room to stick it in.
I know it’s loathsome to get “oh, you’ll see once the baby comes!” advice, but re. not having a freezer in the kitchen….I’d wait on that. I mainly kept ice cream, ice cubes, nuts and so forth in the freezer until my now-22-month-old was eating solids, but now I use the freezer ALL the time. Even simple things like having a bag of frozen peas on hand so you can heat up the little handful a toddler eats…I’d be super-annoyed trekking to the basement every evening to fetch stuff like that! (Also, I rely much more on Trader Joe’s than I used to. Ahem.)
That is a good point…we’ll definitely wait to see how things go regardless. We’ve also talked about doing a bigger fridge/freezer but that would mean redoing the fir panel that wraps over the top and side and it might crowd the dining room space a bit. But at least there’s that option. I have a feeling we’ll be making a few changes in general – like converting the fauxdenza from book storage to toy storage. =)
Mmm…you guys are making me hungry!
I’m a big fan of this recipie. It’s delicate enough to still allow you to taste the fish without leaving you feeling like you spent 2 hours cooking to make something just tastes the same as if you’d baked the fish with nothing on it.
http://www.epicurious.com/recipes/food/views/Pan-Seared-Salmon-with-Pumpkin-Seed-Cilantro-Pesto-368261
I think that’s the most beautiful basement window view I’ve ever seen.
Fish! Wait – first, I think your blog (and skills) are pretty incredible. Now back to fish. Have you heard of Momofuku? David Chang’s ginger scallion sauce is incredible on fish. Or, frankly, anything. And it’s simple. You probably have everything on hand. Just roast a fillet or two, and smear on some sauce. Magic. Even better, roast some veggies on the same pan as the fish, and cover the whole lot with the sauce.
1/2 bunch thinly sliced scallions (greens and whites)
1/4 cup finely minced peeled fresh ginger
1/8 cup grapeseed or other neutral oil
2 teaspoons light soy sauce
1 teaspoon sherry vinegar
Mix together the scallions, ginger, oil, soy , vinegar in a bowl. Taste and check for salt, adding more if needed.
And frankly, don’t follow the recipe to a “t”. It doesn’t need to be.
As always, your work is fantastic. Can’t wait to see the finished project.. however the clock is really ticking for you now. That little life changer will be here soon. Hehe.
As for the fish. Olive Oil Poached Salmon or Halibut for that matter. Sounds oily and not good, but it’s amazing. Check out finecooking.com (I think they have a recipe for both) or just google it. Very good, takes a bit of time, but the results are great.
If you decide a freezer in kitchen is a must have instead of widening the refrigerator area a freezer drawer would be great!
Ooh…I think Kyle and his fishing mates made a similar dish during their trip and Kyle raved about it!
All these recipes are so great…may need to blog about our adventures in fish preparation. =)
That’s a good idea, but I’m not sure we have space (we actually don’t have that many drawers as it is).
You know the guys that sell smoked salmon out of the coolers at the Ballard Market? They give out samples, and the skin that is left over from the samples is great for dogs 🙂 They are happy to give the skin away if you ask them for it! I’m sure that Bailey would love some of that mixed in with his food for a special treat, as my pup always did.
My husband swears by good old salt and pepper on everything. Fish, burgers, etc. We would just broil it with s & p and then put it on a great salad. It’s especially good on caesar salad!!