[warning: long post alert]
New flooring, finally! First though, to truly appreciate the “after”, let’s reflect on the chezerbey flooring of yore.

The living and dining room were graced with green carpet. Fortunately, there were decent oak floors underneath.

The kitchen had linoleum from an unidentifiable era. It may look retro cool, but any natural oils it once had were now long gone and that thing acted like a sponge, collecting dirt and crumbs and refusing to relinquish them without a lot of scrubbing.

And let’s not forget the astroturf in the back porch (which is now part of our kitchen). HORRID!
In the last six months, we have removed all traces of bad flooring and installed a new subfloor over the original fir floors (which were under all the other gunk). Even though the oak could have been refinished, we would have had a funky elevation change and in the interest of not having a giant threshold across our new cohesive “great room” space, we opted to cover it. The added layer also made the floor more stable, reducing any creaky spots.
Our first step was to prep the new subfloor. Even though we installed it to be perfectly level, cork is susceptible to imperfections telegraphing through, so this meant we needed to fill all of the plywood joints, indentions from screw heads, etc. That’s right, it was time for some self leveling compound.

First though, we needed to paint on a coat of latex primer for better adhesion to the subfloor. We used this product from Sakrete.


Since aesthetics weren’t important, we used a couple cheapo rollers for the job.

Poor Bailey, trapped in the bedroom by the two things he fears the most.

The primer dried quickly and left a shiny, slightly tacky surface.

I wish we had more pictures to share of the self leveling compound process, but honestly, it was a bit chaotic. The directions advised not to mix more than could be worked in 15 minutes(!). So we messed around with trying to mix a half bag which meant estimating the mix and then converting the appropriate amount of water from liters to gallons. (We also added some of the latex primer to the mix to give it some elasticity.) Let’s just say we didn’t get it perfect the first time around and the process generally went something like this:
“More water!”
“We need to mix this more!”
“Rags! Quick!”
“It’s already curing!”
“AHHHHHHH!”
Fortunately, Kyle soon got the hang of it and it turned out fine. He ended up troweling it on to make sure the mixture spread into every nook and cranny.

As soon as we were done, we found ourselves stuck outside and it had just started to rain. After rinsing off our tools, we made our way up through the basement and jumped from the top of the stairs to bedroom where we hung out until the floors were dry (or almost dry, as evidenced by all of our footprints, most of which lead to the fridge).

I really think Bailey could care less about the condition of the floors. This marked the end of Day 1 (last Saturday).

On to Day 2 (last Sunday) – there were still some areas that needed leveling out – nothing a little spackle couldn’t handle though.

After the spackle dried, Kyle sanded the areas smooth.

With a fresh coat of spackle dust all over the floors, we ran the vacuum through before laying any tiles. Mr. Dyson, we may be pushing the limits on what your products were designed to do.

Before we glued any tiles down, we needed to figure out where to start. This step may have been a bit over the top, but it ended up saving us a lot of headache. First we took a print-out of the plywood layout plan we had done earlier and then took as-built measurements of the space. We then adjusted our floor plan in AutoCad and superimposed a 12″x12″ grid over that. We then moved the grid around until we had found a layout that didn’t have seams in weird places or that would result in tiny strips of cork at the edges. We also wanted to, as much as possible, minimize cork joints that happened directly over plywood joints. Once we found the best compromise between the different factors, we chose a central spot in the living room and (using a 90 degree laser level) snapped a chalk line in both directions, with our starting place being the intersection of the two lines.

We bought 12″x12″ Capri cork tiles from Ecohaus. Typically they come unfinished or pre-finished with polyurethane. Since we wanted the ability to spot repair, we opted for a wax pre-finish. Unfortunately, after the tiles were delivered (months ago) we discovered that there was little to no finish on the tiles. More on that later.

The tiles are adhered with a special adhesive that most closely resembles Elmer’s glue. The process is similar to working with contact cement. You apply a thin coat of glue to the backside of each tile and to the floor and wait for both to dry before installing. We used a couple thin, low nap roller brushes and disposable plastic trays for the job.

We turned our kitchen island into a glue rolling station. Even though our particular tile color was fairly homogenous, we always worked from a minimum of 4 different boxes, mixing the tiles to ensure there would be enough variety.

We also found that rolling the glue on the diagonal kept the roller from accidentally slipping off the edge and getting glue on the sides of the tiles.

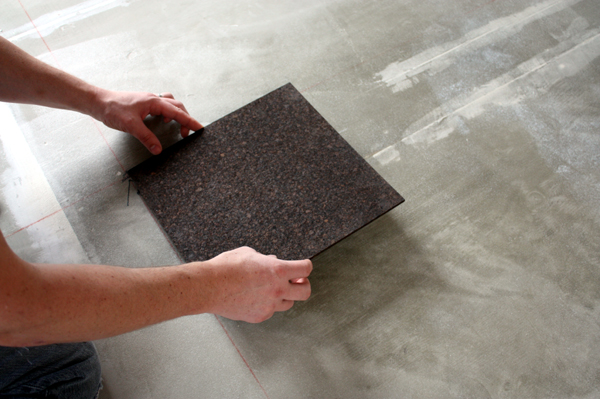
First tile!

After the tile is set, a good smack from a soft headed rubber mallet helps ensure that both surfaces are in contact with each other.

For the subsequent tiles, we found laying them at a slight angle and adjacent to a previously installed tile produced a good, tight fit.

This isn’t so bad! Only 500 more to go!

One of the challenges was finding space for the tiles to dry once they’d been coated with glue. With the tiles and glue we used, we could have applied the glue to the tiles up to 24 hours before installing. If we ever do this again, we may take that route since Kyle could lay them down faster than I could roll them.

The glue goes on opaque and turns clear, but still tacky, when dry enough to install.

We had to custom cut all of the edge tiles, but the process went smoothly with the use of a 12″ speed square, utility knife and small cutting board.


As the night wore on, our energy was dropping and our bodies ached but we had.to.finish.

Every hour or so we stopped to roll the areas that had already been set. We bought a small hand roller for the edges and hard to reach areas.

For the main areas, we rented a 100 lb. roller from Home Depot ($20/24 hrs – the sight of seeing me heave it into the back of the car – priceless). Anyhow, it worked like a champ and was well worth any public embarrassment.

The finished product looked more like suede and was pretty scuffed up from our footprints. We learned later that lower quality tiles can vary in size from tile to tile (!*@?) and we were so grateful that ours were all exactly the same size.


Phew, end of Day 2. Per our original plan, we would have been done at this point. But since there was a glitch with our order, the distributer and manufacturer worked it out so a third-party finisher would come out and do 3 coats of wax finish (using Osmo Wax), with no charge to us. We decided to schedule the 2-day finish job for when we would be out-of-town, since we wouldn’t be able to walk on the floors for those 2-3 days. So while we were at an out-of-state wedding this weekend, our floors were finished (hence the mad dash to get the install done last weekend)! And here is the finished product:


The floors have a matte, more organic looking finish, which we like a lot better than what you might get from a poly-based finish.

The appearance of the cork varies depending on the lighting and what angle you’re looking at. Looking across the room, it reads as a more homogenous, single color flooring, but if you look straight down, you really see the texture and variation of the cork granules.

And the finish is very smooth. For regular cleaning, we’ll just vacuum and use a microfiber cloth mop. The finish can handle a small amount of standing water, but there’s no need to wet mop this floor.

Finally, here’s a peak of the kitchen island against the flooring. The blue-gray high gloss cabinet finish is a chameleon itself, ranging from a light gray to a deep blue-gray depending on the lighting and how you look at it.
So there you have our exhaustive cork experience. Definitely leave a comment or shoot us an e-mail if you have any questions or have gone through the process yourself and have some additional tips to add. (You can also read more about our cork selection process here, here, here and here.) So far, we’re really pleased with how it turned out. In fact, we have (as of today) officially initiated our “no shoes” policy, which is a big milestone because before, it was more of a “no really, don’t take off your shoes” policy.
I love it! The floor and the no shoes policy. : )
Lovely! You both work so hard! Bailey is so patient with you. Our dogs would have been all over the adhesive…
I’d like a progress report on the no shoes policy after a month. We hope to implement such a policy after we complete our addition and remodel. Not sure the kids and dogs are on board. 😉
Great post — I appreciate the detailed walk through of the process/procedure, and this helped show the shoe implications that I wasn’t aware of.
It looks great — congratulations on all of your hard work. I hope you are loving it!
Great detail on right write up. I love the wood beams on that white ceiling. Really finishes of f that look.
You must be EXHAUSTED! It looks great! Congratulations!
Wow! You guys are hard workers but it clearly paid off. The floors look great.
Quick question about the self-leveling compound- you used this because of height discrepancies in your floor, correct? I’m wondering because my basement’s cement floor has all kinds of dips and high spots (from old drains and old patch jobs). I would love to finish it but I need the floor to be level first. Would the compound work for a job like that? I’m not sure if I dare take it on, since you have to use it within 15 minutes!
Thanks for such an informative post.
Wow, the dark cork looks great! Are you planning on using any area rugs or is it soft enough for residential use? I’m considering using it in a small bedroom with quirky wood floor (or else painting the wood & using an area rug). It is always helpful to see the install process from an architect’s perspective.
As for all the prep work that noone sees unless you are DIY and have a blog- my husband & I had our own self leveler adventure earlier this year… http://madisonsquare.wordpress.com/2010/04/18/self-leveler-done/
… and your description of the conversation during the mixing process is right on. It is a two person job for sure, especially over such a large area (our experience was just the kitchen). Congrats on your new floor!
You may want to take a look at Tyroc. It is easy to install and comes in 5.3 sq. ft. panels. It is 100% green. Water proof, mold and mildew proof and adds warmth to any floor. This is a new underlayment/overflooring product on the market. It was designed by contractors/flooring installers as a solution for uneven and wet basement floors. Any type of finished flooring can be installed over Tyroc. Here is a link to an informative video produced by Steve Maxwell a writer for the Toronto Star http://www.youtube.com/watch?v=fqHz29IXPzA
The official site for Tyroc is http://www.tyrocinc.com
If you have any questions you can call or email me. My contact information is on both sites.
Doug
Excellent work; would you be against me using these pictures on my cork flooring website? It’s strictly an educational website for consumers and I would give full credit; just shoot me an e-mail via the site if it’s ok with you.
Great work!
You GUYS. yumyumyum. I’m always so impressed by your work ethic and this is no exception. You’re like superheroes. The floor looks great, love it with the wood trim and white walls, and the texture is really gorgeous. It’s all so crisp and lovely– I know it’s cliche, but I can’t BELIEVE it’s the same house! Zerbey’s to the rescue!
We used the self-leveling compound to fill cracks and divets rather than deal with height discrepencies (since we put down a new subfloor, we were able to even things out from one end of the house to the other). However, we will (at some point) be using it again in our basement to do just what you’re talking about. I know the kind we bought said it could be up to 1″ thick, but there is probably another product if you have a lot of unevenness. I’m not an expert, but I would guess that in your situation you would make the mix runnier than we did and let it just do it’s thing and not worry so much about troweling and pushing it into place like we had to. Go for it!
Hey Kelly,
We will probably do an area rug in the living room, but more so to define the space than protect the floors. The cork is actually quite comfy underfoot, and has more “give” than other flooring types (making is especially good for kitchens where you’re standing all the time). Also, because of it’s cellular structure, it’s warmer than a wood floor too. If you’re going over quirky wood floors, you might consider the floating system which is a T&G 1’x3′ product that can “ride the waves” of less than perfect floors. We were going to use that at first, but after deciding to do a new subfloor everything was level enough to do the glue down kind.
Loved reading your blog post! I did notice the other day one spot where it had (unknown to us) dripped through to the basement. Fortunately it didn’t drip on anything important. (phew!)
Seriously. Great job. I’ve been following you guys for almost a year now and am so excited to see your house come closer to completion. Again, keep up the great work. 🙂 GB
Yipee! I didn’t realize you had to have the floor so perfectly level for cork. We’re thinking of using is on our basement floor which is unlevel but dry. I guess self leveling concrete will be needed. Thanks for all of the pictures it will make a good reference for whenever we get to that area.
Robin, our cork had specific directions on how to prep a concrete subfloor so the product you go with should be able to point you in the right direction. I’d be curious to know how it goes, we’re still not sure what flooring we’ll do in our basement.
I think it looks so fantastic! And I’m sure you’ll appreciate it even more when you’re standing on it for an extended time to finish up any projects! Lovely.
Looks fantastic. I love the dark colour of the tiles.
Just a handy hint from someone whos lived with cork tiles in one form or anohter all her lif e- even though you have a no shoe policy, be careful! You’re bound to forget at some point and walk across them in heals… DON’T! Heals leave the most ghastly marks on cork.
Is it possible to provide a little more detail on the cork? I’m looking on the Capri Cork website and not seeing anything that looks like your lovely floor. I also checked your other cork posts and couldn’t find colour name…
My fella and I will be re-doing the floors in a couple of rooms of our new condo and cork is definitely on our list of flooring options. Hopefully Capri is available in Canada.
Your great room looks just that – great!
Erin, here’s a link: http://www.capricork.com/Mediterra.asp
It’s the Mediterra cork in “dark”. We ordered ours from Ecohaus…they might ship to Canada too. Otherwise, Capri should be able to tell you if they have any distributers near you.
Now that it is a year later, how have the floors help up? Is there anything you would do different? Likes, dislikes?
By the way, thanks for all of the fun readings 🙂
Dave
Hi Dave, we talk a little bit about the cork in our kitchen follow-up post: http://zerbey.wpengine.com/2011/07/28/kitchen-follow-up/
Something that’s always confused me about this process: We leave gaps between the sheets of plywood substrate to account for expansion, but then fill the gaps with compound to provide a smooth surface in which to lay our flooring. Does the leveling compound between the sheets still allowed for expansion, do we not allow much compound in the seams, or am i just over-thinking this all together?
I’m about to start a very similar project (replacing subfloor, gluing down cork in kitchen/living space) and can’t really find a straight answer to this.
BTW – you’re home is awesome.
Hi!
We are looking into cork flooring for our new home. We have two toddler boys and three big dogs. I read your post, which by the way congrats on the kitchen, and was wondering how the cork was doing with the dog’s nails. Is it holding up well?
Thanks!
Hi Fiona, the cork is holding up ok. There are definitely scratches from Bailey’s nails…similar to what would happen with a softwood floor. We used a wax finish rather than a polyurethane, so it’s not as bullet-proof but is supposed to be spot-repairable (which we have yet to test out). The scratches aren’t all that noticeable unless the light is hitting it in just the right way. I guess it would depend on your comfort level with “blemishes”. =)
And one other thing… Is there anything that sets the higher-priced brands apart from the lower-priced ones that can be found at Home Depot? I realize they need to come from Portugal, but it looks like some from Home Depot do come from there and also have the UV-cured finish that others have. So is there any difference worth shelling out the extra money? I wish more brands offered the oil finish instead of the urethane finish. I haven’t tried them in person, but I’m wondering if the urethane finish make the surface harder – and therefore feels harder underfoot.
My understanding is that the cheaper cork has a thin veneer over a different “core” so if you scratched it it would be obvious. But if the cork is just natural color to start with it’s probably a “through body” and ok. If the cork comes pre-finished, it’d be a matter of how durable the finish was. I would think that in general, a urethane finish would be harder than a wax or oil finish.
Hello Lauren and Kyle,
Outstanding job on your installation. As Capri corks Technical Manager I can say that you project looks as good or better than most of the “professional” installations I see on a daily basis. I am absolutely impressed that your not only read but followed our installation instructions. This is something that is often lost on the “pro’s”. Thank you! The evidence is in the quality of your install. If you ever feel like tackling another cork installation please feel free to contact me and I can share some tips and tricks to help even more but truthfully I don’t think you need them. Great job! I am glad I came across your “journey”.