Last Friday was a gorgeous evening. Even though it wasn’t particularly warm, it was sunny…the kind of March day where people flock to outdoor bars and empty the contents of their purse looking for a pair of sunglasses. For us, it was a perfect evening for desktop hoisting! (Ok, it also distracted me from fantasizing about basking in the sun with a glass of wine in hand.)

First, Kyle prepped the stairwell. (Seriously, I came home on Friday to this sight and Kyle napping in the bedroom.) The plan was to hoist the slab up and into the loft between the wall and edge of the loft ladder. (It was far too long to go up the loft ladder and have enough room to rotate into position.)

It would be a tight fit, but we measured everything beforehand to make sure we had enough clearance. (Or so we thought, keep reading…)

Our neighbor Blair came over to help. (He was incredibly gracious and patient and we owe him big time!) As they brought the slab in from the garage, Kyle took the lead and walked it up the ladder…

…while Blair and his brute strength took the heavy end.

I don’t know how much this thing weighs, but moving it was no easy feat. One rung at a time.

I mean, it’s a big piece of wood. [Obligatory inappropriate photo-op.]

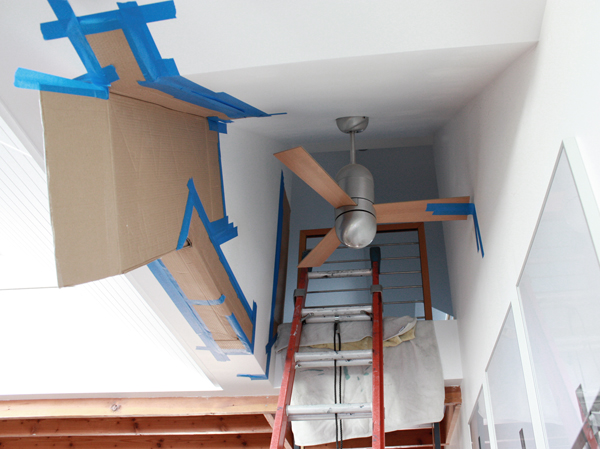
All was going well until we ran into one minor snafu…the loft ceiling. The low-end of the slab hadn’t quite cleared the ceiling below so it was literally stuck. Swearing ensued. (We blame the curvature of the tape measure during our earlier measuring.)
But we put our heads together and decided the only alternative was to remove the ceiling fan blades and the loft ladder and then slide it up on its side.

When we installed the loft ladder, I’m pretty sure we mumbled something like, “at least we don’t ever have to move this thing again!”.
Ha. If there was a bright side, it was that we didn’t have to completely remove it, just lower it enough so the slab could clear the top of the guardrail. The ladder is attached to the floor below and joist above with hefty lag screws. So Kyle removed those and then we used a scrap 2×4 as a kicker to keep it from sliding further.

It was an unintended extra step, but it worked. Turned horizontally, Kyle and Blair had no problem getting the slab into the space and then turning it 90 degrees.

With one final heave, the three of us hoisted the wood up and onto the steel angles. The final step was to attach the slab using stainless steel 1/4″x2″ screws and 1/4″x1″ fender washers at pre-drilled holes at each of the four angle supports.

At this point, it was in place and we called it a night.

But it didn’t take long for me set up shop the next day.

I had thought about moving the painted IKEA stool down to the nursery, but it’s actually a great height for the sewing machine and can easily tuck under the desk when not in use.

For now, I’m using a small IKEA table lamp for task lighting (the only other light we have in the space is the sconce over the ladder). It’s ok, but eventually it will move to the nursery and be replaced with a flexible and brighter work light. (Just need to find one first!)

In lieu of gifts last Christmas, Kyle and I bought each other a Macbook Pro. I’m in love and not just because it’s so pretty. After using a PC my whole life, it’s just so much more intuitive and well…smarter. I still use a PC at work and my brain has gotten better about switching back and forth between the two. We also have a printer/scanner/copier that now has a nice little home in the spot between the last Stolmen unit and the wall. Due to space limitations, we used to keep the printer in the basement so it’s great to finally have everything consolidated in one space. Even better, Kyle has set up everything wirelessly so the printer talks to the laptops and the laptops talk to the Airport Express which talks to the stereo system which talks to our iPhones. Our house is small enough that sometimes the microwave gets bitchy and interrupts, but we deal.

There is still a lot of accessorizing that needs to happen, but I’m totally thrilled with how it turned out and more importantly how the space feels. With the pleasant weather this weekend, I’ve had the roof window open and the soft north light makes the room feel bright and airy. Best of all, I no longer have the visual distractions that come with working at the dining room table or kitchen island.


The walls aren’t perfectly straight and plumb (this is the attic of 102-year-old house after all), so we intentionally created a gap between the edge of the wood and wall. Not only does it look good, but it also provides a space for cords to snake through.

I’m still debating if the sewing machine stays out or instead lives in its case under the desk. Let’s be real, I still haven’t used the thing yet.

Bonus perk of owning a Mac, one minimal white cord.


In the desk progress post, Ron and Nate left some smart comments about better ways to fasten the wood to steel angles (to deal with differential movement) and we listened. Kyle made the holes in the steel slightly larger and used the fender washers in conjunction with the screws.


In addition to a new desk light, there are still several things left to tackle. We have a large IKEA file cabinet that is too big to fit in the loft so I’ve been in the process of purging and organizing all of our paperwork (as seen above). We still had files labeled “architecture school” and “high school” (eek!) so there was plenty of room to edit things down. The plan is to buy a used metal 2-drawer file cabinet that goes under the desk on the window side. I’ve been scheming about finding something ugly but in good shape and spray painting it a fun color (I thought this type of thing would be easy to find on Craigslist or at Goodwill, but no luck so far). Kyle is not on board with this idea. Yet. =)
It’s not done-done, but it’s a good start. As we continue to use the space, I’m sure we’ll get a better idea of what works and what doesn’t. I like the idea of keeping it simple and minimal, but I could also see something going on the gable wall behind the desk and maybe a twin-sized daybed/chaise on the wall opposite of the Stolmen units.

I’m super excited to have this little space to call my own (or at least share with Felix, who is smitten with the new set-up). It feels like a treehouse of sorts and an escape from the constant to-do list downstairs. Up here, I feel more organized, more creative and a renewed itch to tackle projects. A set of curtains for the nursery? A new blog design? Let’s see where this goes…
To see past posts on the studio loft, click here.
wow, it looks fantastic!!
Wow! Looks amazing. Major envy. Would love to have a workspace like that.
Looks Great. Good work. It’s such great use of that space up there.
Looking fabulous! Definitely worth the hard work.
One question, though: if I remember correctly, your loft window/skylight opens wide for egress, so why couldn’t you have brought it up through there?
Oh man, it looks GREAT! The wood turned out soooooo yummy, all that work to get it there really paid off. Well done you guys!!
(I can’t believe you took the loft ladder down…insane.)
That looks amazing!!! So worth the extra effort to get it in place. For the filing cabinet, try some estate sales. I ALWAYS see them there – maybe because older people love to keep lots of paper? I’ve also seen “scratch and dent” ones at Staples on occasion. Good luck!
What a fantastic work space! I’m especially jealous that you can lay out a very long piece of fabric on that desk. Sewing drapes always results in me laying the fabric on the floor, which feels wrong. Great job!
you two are so impressive. what a great workplace you’ve created. leave the sewing machine out. it will haunt you and make you feel guilt and you’ll be sewing in no time!
Also jealous over all that fabric-laying out space. I vote for leaving the machine on the desk – find some fun fabric and make a cover for it though, to keep the dust bunnies out. They love the nooks and crannies of sewing machines.
We considered going through the window, but it isn’t quite wide enough for the slab to go in horizontally and since the window pivots in the middle (rather than hinging on one end), there wasn’t enough vertical clearance to bring it in the other way. (Although, hoisting it up above the roof would have been equally challenging I think!) =)
Ooh, thanks for the tips Melissa!
I was thinking the same thing Chris! I mean, how hard could that be to make? =)
There are tutorials for them online, but I just basically winged it and hoped for the best. Bias tape hides a multitudes of sins, let me just say. 🙂
It looks so great! Way to go guys!
Have you tried the UW surplus store for a filing cabinet? They are open to the public on Tuesday afternoons and may have something that would suit your needs.
Fantastic – as always! What a great space to be creative (or lazy – the choice is yours!).
Rebecca, that’s a great idea! I’m definitely going to check it out. I thought about the Boeing surplus store but didn’t realize there was a UW one too!
that really does look lovely.
while you are in a building mode, march back out to the garage and throw together something to sit the printer on. Make it so you can get some casters on it and still roll everything under the desk.
Trust me, from experience that is a great spot to locate your printer if you don’t want to do anything with it. But you need to able to get it close by if you are going to need to print out a bunch of stuff or scan or change ink or need to read an error code or punch in a fax number.
crawling around on the floor with a flashlight and banging your head on the desk are not usually high on pregnant women’s agendas (nor mine)
so, just curious – you did leave play in the holes in the metal bracket so that when the wood shrinks or expands things don’t crack, right ?
Voice of Mistakes (err experience)
brilliant
yep, 1/2″ diameter holes in the steel, 1/4″ shank on the screws, big fender washers to cover the gap! thanks to some readers on a previous post.
Haha, I had that thought too…although it could also just sit on top of the Stolmen unit if I wanted to be all practical about it. =)
love it!!!!!!!!!
This is one of those times where I can imagine how good a finished project will look, but then the actual finished project somehow turns out even better than what I’d envisioned. Kudos, especially with all the work it took to get it up there.
I agree with what Kurt wrote above, and leave the sewing machine out for now; it’s a great motivation.
I like ron’s idea, out of the way but accessible if we need to pull it out. Pretty simple project too.
This is an incredible work space! It seems so tranquil and productive… I don’t envy the boys having to carry the slab though.. lol! looks great!
Looks so great! I was literally holding my breath looking through the first few photos. We found a terribly ugly 3 drawer, 3 column filing cabinet on Craigslist that a business was selling. We bought it for FORTY dollars! We taped off the cool wood top on it and spray painted the whole thing white, you’d never know. Also, check these out for cords! http://www.bluelounge.com/products/cabledrop/
Ooh…nice. I bet those would also work well for keeping curious cats at bay… =)
Wow, I think it looks so great! I love it and wish to have something like that one day. 🙂 And having Felix around will be great, at least you’re not alone, but no one is bothering you as well. 🙂
Looking good!!! Maybe one day we’ll both be able to sew 🙂
That Ikea stool is the perfect height as a sewing chair. I am using it for the exact same thing. I vote for keeping the machine out and covered.
Haha, whatever…you’re already way more advanced than me!
SO jealous! I love it. Now am wondering how much space is in our attic… 🙂 awesome as usual guys!
I was just there on tuesday and they have (probably literally) tons of file cabinets and also lost of metal bookshelves and carts and whatnot. It was really interesting!
I didn’t know about the Boeing one – I’m going to have to check it out!
looks amazing, great job!
So If you’re looking for a work light, I highly recommend the new Pixo lamp by Pablo designs. All LEDs so it’s pretty efficient, highly adjustable, and it even includes a powered USB port charging gadgets.
http://pablodesigns.com/task/pixo/pixo/views.html
I got a white one recently and I got one and I really love it. Seems like it might work for you.
Sweet, thanks Aidan. What was the price on the Pixo lamp?
That looks beautiful!
This is awesome and exactly the project I’m looking to do in our office. What kind of wood did you use and where did you get it from? Are the only things holding it up the steel brackets? Was this one piece of wood or two long pieces seamed together? I only hope our finished product looks half as good as this!
Alright, lets go back a couple years and throw a comment on an old post! I have a question about your loft reno, as we’re hoping to do something similar in the next year. Did you have to beef up the joists? We’ve been told a couple times that we probably just have old 2x4s up there right now and wouldn’t be able to use it for storage even. Curious how that worked for you guys!
Hi Evie, the joists in our living space are 2×6’s at about 16″ on-center. We didn’t beef them up and it’s been fine. The old fir is usually stronger so a 2×6 from 1910 is better than a 2×6 from today. Of course, it also depends on how far they’re spanning – our span is about 13′ – and if the joists have any holes or other imperfections that would compromise their strength. You could always have a structural engineer check it out if you’re not sure. (Better to be safe than sorry, right?) 🙂
Stumbled upon this looking for ideas on a floating desk for my office. How long are the steel angles and the depth of the desk? Can a pair of angles be sold to me?
hey there,
i just came across your post. I’ve been trying to install a similar desk situation in our home for a few years. I know; everything takes forever at my house. Anyway, can you tell me where you found the steel angles? I was just going to use brackets but I’d rather not we all hit our knees.
thanks; your house looks so clean and gorgeous.
I cannot find these brackets / steel angels for the life of me! Can anyone please point me in the right direction????
Hey, I’m working on a similar project and wondering where you found the steel angles. I can’t find them anywhere. Looks really nice, btw!
Thanks!
Emily
Where do I find the angle iron supports?
Where can I buy the steel angled support brackets?
Where did you get the black metal brackets????
Hi, I found your post on Pinterest and I love the design…so modern and clean.
I have a couple of questions. Is the floating desk sagging in the middle?
I want to do the same thing for my office on the wall that spans 157″. Will have 2 monitors on it. Was wondering if this setup is strong enough.
Hello,
Where does one find the bracket holding up the desk? I’m not sure what to google?
thanks, Sarah
Came across this while looking for ideas on long floating desks. Who made that desk and what is it made of? It looks like rough sawn lumber spliced together will a threaded rod? Thanks!
Hi, love your post and am about to install a floating desk in our new apartment and really like your wall brackets. Can you confirm where you bought those and inform me how they are holding up?
Thanks so much, looking forward to your response.
MJ