On Friday morning, the wallboard, mud and tape were delivered. These are just the 12′ sheets. (There were about the same number of 8′ sheets – half went to the loft and half to the 2nd bedroom.) It was at this moment that I thanked my lucky stars that we had decided to hire this out. We’re all for sweat equity and figuring things out on our own, but not when it comes to this. For one, we lack the combined required muscle (when we hung sheetrock on our bedroom ceiling – I resorted to using my head after my arms gave out – it wasn’t pretty). In fact, I’d even put hanging drywall on the list of things spouses should never do together (it’s right up there with a 2-person kayak). We also recognize that doing a smoothwall finish is an art and something we don’t have the time or patience to acquire. And really, I think that’s ok. We’re not out to win the Ironman of home remodeling or anything. Doing more work ourselves just means that it costs less, we learn something, and (usually) it’s pretty fun.


This weekend was also HOT (by Seattle standards anyways). We don’t have our stair fan installed yet, so we picked up two box fans to help encourage airflow (one in the basement blowing cooler air up, one in the roof window in the loft pulling hot air out). Along with the new insulation, it kept the house mostly tolerable.

With insulation done, it was time to install the plywood bead board ceiling and reglets. Reglets are basically aluminum shapes that (in our case) serve as transition pieces between two different materials (drywall and plywood).

The shape on the right has a notch on one side to accept the drywall of the flat ceiling and a deep lip on the left side which acts as a visual termination for the plywood. For the “J” shape on the left (think upside down J) the drywall for the walls will slide up into the reglet. This way, there’s no weird seam where the drywall of the wall and bead board of the ceiling meet. An additional trim piece could be used instead, but being the modernists that we are…we like clean lines and reveals. It’s a lot more work, but we think it will be worth it.

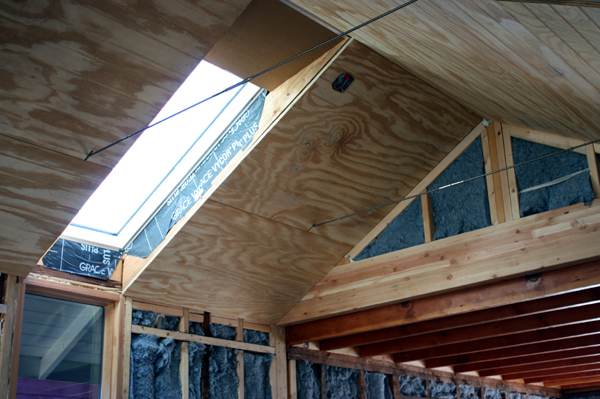
And then the plywood ceiling went up! (Kyle actually installed half the ceiling by himself while I was getting a pedicure and brunch with girlfriends. Did I feel guilty? A bit. Secretly overjoyed. Yes!) We’re using plywood bead board because it’s less expensive and a lot less laborious than installing individual tongue and groove boards. After drywall, we’ll paint it white to match everything else. The tapered header and edges at the skylights will be drywall, with more reglets between the two materials.

I was surprised how much taller the space felt once the ceiling was up. The rest of the install turned out to be a bit trickier, as we had to do small customizations to several pieces so the horizontal grooves all aligned. Oh the joys of dealing with 100-year-old framing!

And there you have it. We are now on week 20 (20!@*), but thrilled that the drywall is going up this week.
Your progress is incredible! I can’t wait to see the next few posts when the spaces will really transform. I was inspired to comment because I couldn’t agree with you more about the 2 person kayak. We rented a sea kayak on our honeymoon in Costa Rica and…let’s just say it was our first real test as a married couple. It’s great that you are both still enjoying your house project; good luck with the rest!
🙂
Great job so far. I’m excited to see these transitions up close when they are finished. Please include some pics, I just can’t visualize it myself.
It’s really coming along and looks great! I’ve enjoyed these weekly updates along the way. And I couldn’t agree more on the drywall — I don’t mind hanging a few sheets here and there w/ my dear wife, but would never tackle that much area as a DIY.
That insulation cracks me up for some reason. It looks like the whole house is wearing pants.
Drywall is like the seventh circle of hell. The dust, the mud, the endless sanding. Probably good thing you hired out. Drywall is pretty exciting though…you are on the road to being done!
“right up there with a 2-person kayak” Oh my goodness, LOL!!!! Obviously one has to experience it to get the joke, and you are so right! Great job guys! Question (pardon my ignorance), did you just notch the plywood to allow it to fit around the horizontal wire? Looks perfect, can’t imagine it would be easy, even measuring accurately. How’d you do it?
Hey Laura,
There’s a seam in the plywood panels right where the end of the tie rod is, so Kyle just made the notch in one panel with a jigsaw. Later, we’ll go back in with non-shrink exterior spackle to fill the void and then sand it down and paint everything white. Hoping that does the trick!
Hi, I love following your blog and all the projects you’re doing! I have a question about the plywood beadboard ceiling. I’ve thought about doing this in my kitchen (to cover my cracked textured drywall 70’s style ceiling), but I can’t figure out how you’d handle the seams between the ends of the plywood so it wouldn’t look bad. How are you guys handling that part of it?
Hi Dawn, the beadboard plywood is tongue and groove on the long ends (parallel to the beads) so you don’t have to worry about the seam there. For the short ends, we were able to get away without any seams on the south side because of the skylights, but we do have two intermediate seams on the north side. For those, we used a small aluminum T shape to hide the seam (installed with Liquid Nails), which will eventually get painted white along with the plywood. You could also do a piece of small wood trim to cover the joint, but we liked the metal because it could be a lot smaller. Some other people have asked about the different metal pieces we’ve used, so I think we’ll probably do a post that talks about that and will include some detailed photos.
where did you get your reglets?