With our efforts focused on finishing the main floor, the attic loft has been “almost finished” for several months now. But with summer looming (and summer in Seattle = lots of visitors), it was time to put our work pants back on and just get it done.
First though, let’s go back in time:

This photo was taken in 2006 during the inspection, a fairly typical attic by 1910 standards (minus the structurally questionable chimney).

In the summer of 2007 we tore off our roof. I love this shot from inside the attic, but man…talk about a nerve-racking couple of days when we literally didn’t have a roof. During this project we also sistered on new 2×4’s to each existing 2×4 rafter and took out the knee braces and chimney.

This photo was taken a year ago, right before demo. Kyle and our friend Dustin painstakingly shoveled insulation to one side of the attic so we could demo the ceilings over the kitchen/living/dining area (at the time, the loft was not part of the plans).

But after demo, we couldn’t not make use of that space and so here we are today – yes, it’s still an empty room, but it’s done.

I painted the space in January so it was really just flooring and finish electrical work left to do (since we’ve also thought about using the area for a little home office, Kyle installed CAT 5 and ethernet too). For flooring, we ended up going with the “Love Ewe” wool carpet tiles (in “Dorset Brown”), which were generously provided by Flor. The tiles are made in the USA of dye-free wool and they are super soft to walk on!
Before ordering the tile, we took measurements of the space and did a quick layout in AutoCad to figure out how many tiles we would need and what would be the most efficient configuration.

After the boxes of tile were lugged up to the loft, we decided to start with a single row down the center, snapping two chalk lines on the plywood to serve as a guide.

At the edges and ladder opening, Kyle trimmed each tile using a utility knife and metal straight edge.

For anyone who hasn’t worked with Flor tiles before, they are very easy to install. It’s a “floating” system, which means the tiles don’t actually stick to the floor. Rather, a round plastic sticker at each corner holds the adjacent tiles to each other and since the tiles are bound by walls on all four sides, they don’t move at all. By starting in the center and working our way outwards, we were able to ensure that everything was straight and that all of the cutting would be saved for last. (Note: we installed the baseboard trim earlier in the process, holding it slightly off the subfloor so the tiles could easily slip underneath.)


In less than 2 hours, we were done! We really like the texture and color of the tiles (I know…brown, we’re so predictable) and we look forward to this being a dog hair free zone.

At the opening for the ladder, Kyle made a custom shaped trim piece out of fir, with a slight lip so the floor tiles could tuck underneath. The sconce above is from Resolute and the switch is located low and to the right of the ladder, so it’s easy to flip the light on as you’re coming up the ladder (or vice versa). The other paddle switch is wired to an outlet on the opposite side of the room, with the thought that we’ll eventually have a small lamp there to provide more even light for the space.

It’s a little hard to tell in this photo, but we also installed a roller shade for the roof window. It provides some privacy and a nice, diffuse light for the space. Tucked inside the frame is an exterior black-out roller shade that can be used on hot days (though judging by the spring we’ve been having, the next hot day could be months away). For those that are new here, the roof window pivots at the mid-point, creating an opening large enough to crawl out of in case of an emergency.

Unlike traditional lofts that are completely open on one side to the space below, we decided to instead create a light shaft over the basement stair to provide visual connection to below. (The alternative was to do a single-slope vault over the kitchen and dining with the loft completely open to that space, but we were concerned that the proportions would feel weird and the ceiling shape might be too ’70s for our taste.) Anyway, we wanted to maximize the opening but also needed to provide a guardrail to prevent any accidental toppling into the basement. In what I think is a pretty elegant solution, Kyle designed the loft ladder handrail to extend up and become this guardrail. Not only does it look hot, but it’s a good place to grab onto when going up or down the ladder. With a steel skeleton, it’s rigid enough to take the force of people pushing against it.


Sorry Bailey, you lose on this one.

From below, the angle is oblique enough that the space still feels secluded. The vaulted area also provides a means to exhaust warm air out of the house during the summer.

Kyle and I took a moment to bust out our Modulor Man poses. I think Corbu would approve.

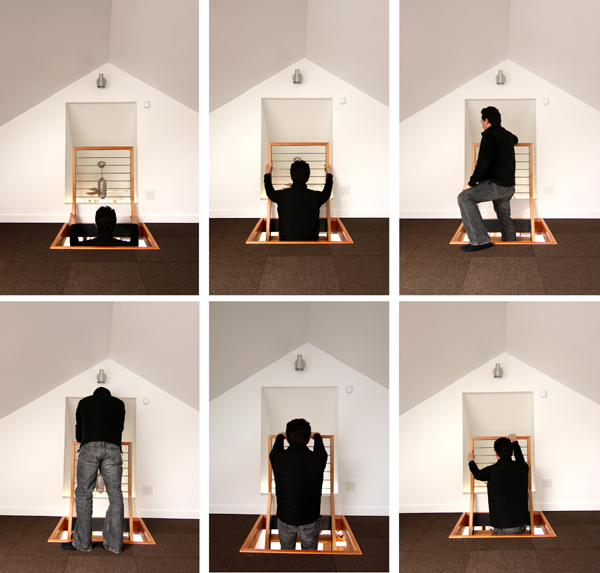
Finally, here’s a little tutorial on how to enter and exit the loft. Understandably, some people get a little nervous with ladders so we tried to make the journey as easy and natural as possible.
Of course, we still have plans to actually furnish the space but since it’s mainly going to be a spot for guests and Sunday afternoon reading (which is what Kyle is doing as I type this – oh wait…sounds like he’s playing Tiny Wings now), we’re in no big rush. We do have some ideas for different layouts that we’ll share later, but in the meantime we’re going the inflatable route. That’s right, we have a pretty deluxe Aerobed that we got from a friend and with an old quilt and some fluffy pillows I’m sure we can make the space look bohemian chic.
wow! I’m so impressed that words can not describe it.
I do however love the ladder. It makes the person feel
soo much better to start at the same height as the floor
and not dip down without feeling of loosing their grip.
Love it!! Apologies if you covered this in an earlier post, but what did you do for insulation along the roof line, now that you’ve got the interior room right up against it? Our 1912 home has bedrooms and a bathroom that have sloped ceilings like your new loft, and those rooms are noticeably colder in the winter as the heat escapes right out that roof. Is this simply not much of an issue in your warmer Seattle climate? (We’re in MA.)
Hi Vivian,
The WA State energy code is actually pretty stringent and so we installed R-30 (that’s 5″ thick) rigid insulation between the rafters and recycled denim batt insulation in the walls. We also used expanding spray foam to seal up any penetrations in the exterior walls or roof before we insulated. We didn’t go up there much this winter, but it will be interesting to see how it compares to the temperature of the main floor. We’re counting on some of the warm air from the main floor rising into the loft too.
It looks so great, per your usual fashion. I always get so excited when I see a new chezerbey post in my reader. And I love seeing what Bailey is up to – almost what I look forward to most. I hope that you are/will reap tons of professional opportunities from this record of your beautiful work.
I love how you designed the loft ladder. It’s a really elegant solution, and it’s great to have something to hold on to once you’re up. Also, it’s super cool that the flor tiles are the natural color of the sheep’s fleeces.
[…] Nice related topic here: http://zerbey.wpengine.com/2011/04/17/loft-reveal/ Posted in Cottage […]
Nice as always. But is that hole large enough to get furniture through without removing the ladder? Modular Man pose, nice.
I am also anxious for you in regards to getting furniture up there! I am picturing lots of Ikea furniture schlepped up the ladder unassembled…. 😮
Love the space, though! I am jealous, to no end, of your home!
There’s really just enough space for a bed (or two twin beds), a small desk and maybe some small shelving at the eaves. We would find things that could be assembled in the space and we already have a few ideas for the bed(s) (hint: no box springs!) =)
I was also wondering about getting furnishing into the loft the whole time I read this awesome post. Didn’t think about unassembled furniture – you’ve got your thinking cap on!
Kristen
Truly an innovative space here — great work on design, fit, and finish.
Wow! What a great found space! I’m sure you’ll be so happy you have it and that window is incredibly cool. Yeah for free Flor!
i love the tutorial! hope you print out a little pic of it and hang it on the wall or maybe have a little fold out one to hand guest, something like what the airlines have ; )
you guys are rock stars in the DIY home projects, can’t wait to see the backyard!
Excellent work, as always! Thank for including the Modular Man poses – really helps to see what size the space is. Yay Chezerbey!
I’ve been reading for awhile now, and just wanted to say that ya’ll are the bee’s knees! It’s good to see you in some pics as well. We are at the beginning stages of our reno. Seeing your progress is so inspiring – thank you for sharing!
Love Tiny Wings. Addict here. 🙂
I love it! I can’t wait to visit chezerbey and sleep in the loft! Also, I think the picture tutorial of going up and down the ladder should be posted in the loft next to the ladder. : ) Great work guys! I also love the modular man poses.. : )
Oof — this is just making me ache with envy! Our 1930s bungalow attic looks just like your before — only with our new geothermal unit that will likely prevent any such elegant loft. How was disassembling that chimney? I’ve heard it’s hard hard work, but I’m anxious to do ours so we can 1)reclaim a couple square feet in the kitchen 2) prevent more fallen bricks from pressing against the inside of our interior walls 3)get those old bricks for a patio!
For better or worse, our chimney came down very easily! Basically we just knocked the bricks down into the chimney till we got down to floor level (in the basement) and hauled it all away. It just depends on the age of the chimney and the condition of the morter.
so amazingly perfect. such a wonderful space for guests or lounging. can’t wait to see the furniture ideas.
Very amazing addition to a typically unusable space. Gives me some ideas for my space.