Earlier this week we showed you how replacing our old washing machine and dryer turned into this epic project and now we’re back with round two of “Zerbeys Gone Crazy”.
Here’s what happened: while planning for the new laundry area we decided that it might be a good idea to go ahead and rough-in the plumbing for that second bathroom that we thought we’d add someday. SOMEDAY.
Well, someday is today. Sort of. (Let’s just call it male nesting.)
Even though we’re not planning on having a finished basement bathroom for a while, roughing in the plumbing feels like 80% of the job, especially when you’re dealing with the challenges of a below-grade loo.

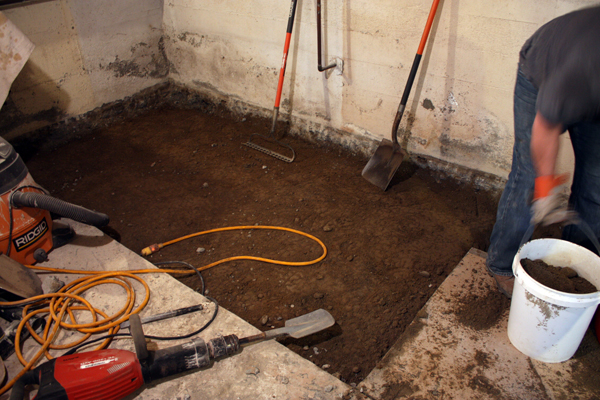
First, we had to remove the existing basement slab. In lieu of removing the entire slab, we could have jackhammered out trenches in which to run the new plumbing, but because the space is so small and we needed some extra ceiling height anyway, we decided to just go for it. So Kyle rented a concrete saw (like this one from last summer), snapped some chalk lines and got to it.

Our slab is unreinforced, but still about 3″-4″ thick so it was no easy task.

See the joy and excitement in his face? It seems like every time we work with concrete we get through the ordeal by saying, “well, at least this is the last time we have to do this!”. HA.

After cutting the concrete, Kyle returned the saw for a jackhammer and busted out and hauled away the rest of the slab.

The soil under the slab is extremely hard (good for our foundation, bad for Kyle’s back), so Kyle rented this spade bit attachment for the jackhammer to help loosen things up.

To get a 6′-8″ ceiling height (code minimum in Seattle), we had to remove about 8″-9″of dirt (plus several feet for our sewage ejector pump, but more on that in a bit).

Kyle found that the best method for removal was to shovel the loosened dirt into 5 gallon buckets and then transport them to the back of the truck via the future bedroom window (turns out egress windows aren’t just for humans…they also allow 5 gallon buckets to exit safely).

Because our sewer line is above the floor level of our basement, we needed a way to get drain water and, err…”waste” to flow upstream. After a bit of research we decided on a sewage ejector pump that would be located in the future closet adjacent to the bathroom. The pump is pretty hefty in size (like a regular size keg) and thus required a sizable hole to reside in.

Kyle LOVES digging! (Actually, the seriousness of this photo is counter balanced by the fact that Kyle is wearing Bailey’s “Furry 5k” bandana.)

But after countless hours of back-breaking labor, the digging was done! (I kid you not, a couple of weeks ago I had to talk Kyle down from tearing out the basement slab under the future bedroom too. Something about “you’ll be digging dirt and changing diapers…”.)

The next step was to build and install the formwork for the new footing. To tie the new concrete into the old, Kyle drilled holes into the cut face of the existing slab (you can see one in the top middle of the photo above) for rebar that would connect to the new footing.

Next, Kyle cut 12″ lengths of #3 rebar and used two pipes to bend the bars into 90 degree angles.


I do love a good simple machine.

And where you find rebar, you’ll usually find concrete. The pour was too small to warrant ordering pre-mixed concrete, so this was option #2. [If you were wondering just how many bags of Quikcrete you could fit in the back of a Volkswagen, it’s apparently 20.] It’s still 1200 lbs worth of concrete. Ridiculous.

The formwork for the footings mostly came from scrap that we had lying around, but Kyle also used some plywood to scab a couple of smaller boards together.
When you grow up in a state with a distinguishable shape, you see it in all forms for the rest of your life.

Yes, our house is fully detailed in AutoCad and we use it as a construction tool to check dimensions and measurements as we work. I guess it’s one of the perks of being both the architect and the builder.

Here is an above shot showing the formwork in place and rebar set for the new footing. The right angle pieces that you saw earlier are now epoxy-doweled into the existing slab and then tied to long horizontal bars that wrap along the perimeter.

Here’s a quick shot of the sewage ejector pump in its new home. The manufacturer recommends using pea gravel to set it (instead of concrete) just in case it ever has to be removed.

Felix’s litter box keeps getting displaced depending on where we’re working and once we saw that Bailey had discovered its new floor location (so disgusting) we had to relocate again.
This is the remodel life Kitty, get used to it!

…and then we realized that just two feet away we had constructed what looked like a giant litter box. Oh, you can tell he’s thinking about it. Fortunately he didn’t follow through.

In the photo above you can see the stub outs for the supply, waste and vent lines poking out to the right of the dryer. After the footing and slab are poured, we’ll build-out the furring walls and install the rest of the plumbing rough-in.

We need to get an updated floor plan on here, but the basic idea is (from left to right in the above photo): tub, toilet, sink. Kyle used pea gravel (from our backyard stash) to help set the slope of the ABS pipes against the weight of the concrete.
The next steps are as follows:
1. pour footing
2. strip formwork, prep for slab pour
3. pour slab
4. frame out furring walls
5. install rest of plumbing rough-in
6. get final plumbing inspection and close-out that permit!
7. move on to the original basement priority (the guest/media room) and hope we can finish before the baby comes(!)
I’m crossing my fingers for co-gender nesting super powers.

Lauren Zerbey is a Seattle-based architect and principal at Studio Zerbey, specializing in custom homes and residential remodels. With over 20 years of experience in the Pacific Northwest, she writes about the relationship between thoughtful design, creative problem solving, and the livability of the homes we love.
YOU TWO AMAZE (and make for a bit of jealousy on my part!)!!!! It pays to have two highly talented architects, that expecting a baby, to tackle the “To-Do List”… I guess! Kudos!!! (especially envious of your washing/dryer setup). Rooting for team Zerbey!!! Huzzah…
Good LORD. How do you even know how to DO ALL THAT!! I probably missed it, but where will the *ahem* stuff go from the waste ejector – I assume it ties in somehow to the sewer line? You can tell I know all the technical terms for this stuff.
Speechless. Co-gender nesting super powers are quite impressive.
Thanks Cheryl, supportive comments like yours are a big motivator too! =)
Yup, basically the waste drains into the pump and then there will be a pipe that goes up and around the foundation wall where it will tie into the sewer stub out by the dryer (which runs further down the wall and then outside to the sewer line).
is it weird that i’m almost jealous of your house projects? i want to pour concrete!! i love that you are able to completely make this house your house. there are so many (major) things that i’d love to do to our house, but knowing that we’ll only live here for maybe 5 more years makes it difficult to justify the time ane expense. i’m already worried that we’re spending too much on our kitchen renovation!
What’s the dimension of that bathroom? I’m trying to fit a 30″x60″ stand up shower, with a toilet and a sink in a space that is 65″ by 80.5″. Not the easiest thing.
It’s only 54″ wide by about 96″ or so long (might be a bit longer). You’ll need at least 60″ for your shower and toilet so that would leave you with about 20″ for a sink. Seems doable – IKEA has a few tiny sinks if you don’t mind a wall-mounted option. Or you could get one of those toilets that has a sink over the tank. =)
our interior dimensions will be 54″ wide x 108″ long, so if you did a 30×60 shower, then code requires another 30″ for the toilet (15″ on each side from centerline of toilet) that would leave you with 20.5″ for a sink. There is such thing as a toilet and sink combo but I think they’re kind of gross. Also minium code dimension for a shower is 30×30 but that’s pretty tiny so you could do that in the corner, have 30″ wide left in the other corner for toilet. then you would have 50.5″ for a sink and cabinet. Shower is probably too small though even if it meets code;) hope this helps.
Lauren, the first picture looks like I have a tail;)
Kyle is a machine! I’ve just discovered chezerby recently and have back read your blog over the last week or so and have been utterly impressed with all the work you two have done. I’m a bit younger than you guys, living in Canada and working in architecture and am beginning the process of licensure. I recently purchased my first home and have begun my renovations, which sometimes feel daunting going at it alone. In short what you guys have done is very inspirational. It seems there is nothing the two of you can’t tackle.
LOL!!! I had to go back & look – I didn’t notice it the first time 🙂 You two rock!!
I too am amazed. Neither me nor my husband (nor our zillions of architect friends) could actually pull off the level of DIY that you guys tackle again and again. It is so much fun to read all of these posts. And very ambitious given the baby on the way! Good luck and looking forward to seeing all the progress.
Whoa- that’s hardcore, guys. If zerbebe inherits your industrious genes, I’m guessing you will have your hands full!
Thanks Lilly, the baby is definitely the motivating factor right now. Too many of our friends (especially architect friends) warn us to get as much done pre-baby as possible. =)
Thanks Ilya! It makes a huge difference that there are two of us, we have a few friends that remodel single-handed and it’s totally impressive (b/c of course you still have to remember to do things like laundry and eat too). =)
Good luck with everything! Taking exams in conjunction with remodeling is NOT fun…so glad to be done with that. 😉
Oh dear…hadn’t thought of that. =)
hmm, never thought of it that way;) if so we could teach her how to identify and pull weeds from the new landscape;)
Or, perhaps get her to help out with the floor: http://www.neatorama.com/neatobambino/2011/08/13/baby-dust-mop/
wow, just wow;)
This is great, now we don’t have to fix our broken mop! =)
As the owner of a ‘herd of half-wild shorthairs’, I totally saw the dream litter box coming. Poor Felix…lol!
I poured some concrete last night for the footing and woke up to find his paw prints all over the place;)
[…] enough, after the last marathon weekend of working in the basement Kyle caught some type of flu-like funk and was out of commission for a […]